How to Fix Off Center Cards: The Ultimate Step-by-Step Guide
Learn how to fix off center cards with design checks, correct printing setup, and precise trimming for professional results.
Estimated reading time: 8 minutes
Key Takeaways
- Alignment matters: A centered design enhances professionalism and readability.
- Digital tools: Use grids, guides, bleeds, and safe zones to lock elements into place.
- Printing setup: Disable auto-scaling, square your paper stack, and run test prints to catch skew early.
- Precise trimming: Measure margins, pencil-mark cut lines, and trim in small increments for perfect centering.
- Troubleshooting: Minor shifts can be fixed with simple trimming or mounting on a backing layer.
Table of Contents
- Understanding Off Center Cards
- Common Mistakes Leading to Off Center Cards
- Step-by-Step Guide: How to Fix Off Center Cards
- Troubleshooting & Additional Tips
- FAQ
Understanding Off Center Cards
“What causes off center cards?” It’s not just about aesthetics—misaligned elements can distract your audience and even cut off vital text. Whether you’re working in a design app, sending files to print, or crafting by hand, centering defines your card’s final look.
- Digital design/layout:
- Misaligned guides or safe zones in your software.
- Printed cards:
- Uneven borders or artwork shifted during printing.
- Handmade crafts:
- Uneven fold lines, crooked panels, or layers glued off-kilter.
Why it matters: Centered cards look polished, guide the eye naturally, and keep critical elements within safe cut lines (Source: graphic design tips).
Common Mistakes Leading to Off Center Cards
- Misalignment in Digital Design: Failing to use “Align center” or “Distribute spacing” tools (Adobe Align Tools).
- Inaccurate Measurements & Guides: Eyeballing the center, mixing units (inches vs. mm), or mismatched software guides.
- Printing & Cutting Errors: Paper misfeeds, auto-scaling (“Fit to page”), wrong paper size, and manual cuts with dull blades (Source: HP Printing Issues).
- Handmade Assembly Issues: Wet glue sliding layers, folding without scoring, and dry-fitting oversights.
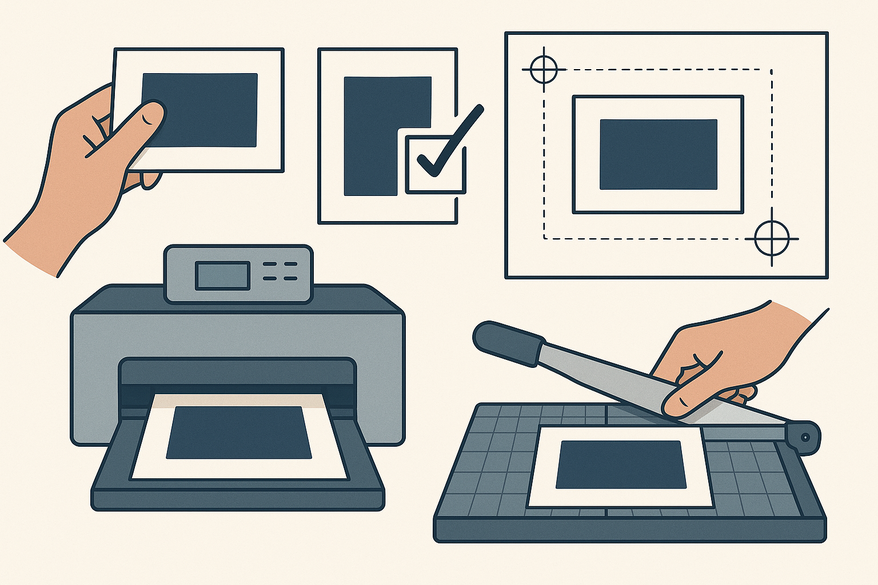
Step-by-Step Guide: How to Fix Off Center Cards
3.1 Preparing Your Workspace
- Essential Tools: Clear ruler (mm or 1/16″), pencil (hard lead), eraser, paper trimmer with guide rail or craft knife + metal ruler + cutting mat.
- Alignment Aids: Grid mat or self-healing mat, printed templates, and on-screen rulers/guides.
- Work Environment: Flat, well-lit surface with stable tools and no clutter (Source: trimming paper guide).
3.2 Reassessing the Design (Digital Fixes)
- Document Size & Margins: Set final dimensions, add 1/8″ (3 mm) bleed, and a 1/8″–1/4″ safe zone.
- Alignment Tools: Enable rulers, grids, and guides in Canva, Illustrator, or InDesign. Drag guides to the exact center and apply “Align center” both horizontally and vertically.
- Correct Off Center Elements: Measure edge-to-edge margins on screen, adjust until they match, and zoom to 200–300% to catch tiny shifts.
- Export Settings: Output PDF at 100% scale with bleed and crop marks. Disable any “fit to page” options (Source: printing bleed safety).
3.3 Correcting During the Printing Process
- Printer Setup: Choose exact paper size and cardstock profile; turn off auto-scaling.
- Paper Alignment: Square the stack, adjust tray guides so they’re snug but not pinched.
- Test Prints: Print on plain paper, measure margins for consistent skew, and adjust registration offsets.
- Final Corrections: Shift your digital canvas 1–2 mm opposite the skew and re-test until margins match.
3.4 Post-Printing Adjustments for Handmade Cards
- Measure & Mark: Determine final panel size, note the smallest margin, and light-pencil new cut lines.
- Trimming: Trim larger margins first in 1–3 mm increments; for major shifts, cut smaller and mat on a larger backing.
- Realigning Layers: If glue is tacky, slide into place; if dry, trim and add a mat to balance.
- Precise Assembly: Dry-fit panels, mark center points, align, and press from center outward.
Troubleshooting & Additional Tips
Minor vs. Major Misalignment:
• 1–2 mm: Trim or mount on a backing layer.
• Moderate: Recut, remount, or reprint for best quality.
• Major: Use the off-center proof as a prototype and remake.
Professional Tools & Services: Local print shops, precision trimmers with alignment jigs, scoring boards, and batch-project templates.
Common Pitfalls: Forgetting to disable “fit to page,” designing too close to trim edges without bleed, and relying on sight rather than rulers (Scor-Pal tutorials).
Pro Tip: For trading cards, try Card Centering Tool for sub-millimeter measurements and grader tolerance checks—avoid costly submission fees on imperfect cards.
FAQ
- How do I know if my card is off center?
Measure all four margins—unequal distances indicate a shift. - Can I fix minor misalignment after printing?
Yes. Trim the larger side in small increments or mount on a slightly larger backing. - What bleed and safe zone settings should I use?
Standard bleed is 1/8″ (3 mm) and a safe zone of at least 1/8″–1/4″ from the trim edge. - What tools help ensure perfect cuts?
A paper trimmer with a guide rail, a metal ruler with a craft knife, and a self-healing grid mat.


