10 Essential Beginner Card Centering Tips for Flawless Grading
Discover essential beginner card centering tips to enhance grading success and increase card value. Learn about proper alignment techniques and avoid common pitfalls.
Estimated reading time: 8 minutes
Key Takeaways
- Centering determines grade and value: well-aligned cards command top grades and higher market prices.
- Use a clean, well-lit workspace: eliminate shadows and visual clutter to spot misalignments.
- Compare to known standards: align raw cards with PSA, BGS, or CGC slabs for accurate judging.
- Measure both directions: check left-to-right and top-to-bottom; record the worst ratio.
- Practice regularly: develop an eye for centering with a variety of bordered and borderless cards.
Table of Contents
- Understanding Card Centering
- Why Centering Matters
- Common Challenges for Beginners
- Essential Beginner Card Centering Tips
- Visual Aids & Diagrams
- Tools & Resources
- Practical Step-by-Step Guide
- Final Thoughts & Encouragement
- Call-to-Action
- FAQ
Understanding Card Centering
Centering defines the left-to-right and top-to-bottom alignment of the printed image versus the card border. Grading companies measure this as ratios:
- 50/50 – Perfect symmetry, equal borders on opposing sides
- 55/45 or 60/40 – Slightly off but usually within high-grade ranges
- 70/30, 80/20 – Noticeable misalignment, often leading to subgrade penalties
Key terms:
- Borders: The margin framing the main printed image.
- Front vs. back centering: Front centering carries more weight in subgrading; back centering still affects overall grade.
- On-bordered vs. borderless cards: Bordered cards use frames; borderless rely on text, logos, or graphics as reference lines.
- Worst-direction rule: Graders record the worst ratio (left/right vs. top/bottom) as the centering subgrade.
Centering is a critical subgrade for PSA, BGS, and CGC. Even perfect surface, corners, and edges can’t compensate for an off-center image. Learning these basics sets the foundation for consistent grading results. For a detailed walkthrough of manual vs. app-based measurement methods, see a step-by-step centering guide.
Why Centering Matters
Grading Impact
A card with perfect edges, surface, and corners but poor centering can drop a full grade or more. According to PSA grading impact overview, centering can account for up to 30% of the overall subgrade calculation. BGS and CGC use similar weighting: poor alignment often caps a card at a mid-grade even if other aspects are flawless.
Value Impact
Two PSA-graded 9.5s can vary by 20–30% in market price based solely on centering differences. A PSA 9.5 with 55/45 centering often sells for 20% more than a 60/40 counterpart (Source: CardPriceGuide). Collectors and investors prioritize cards with top centering ratios because they hold and increase in value more reliably.
Aesthetic Appeal
Well-centered cards look balanced and professional in slabs, displays, and binders. Off-center cards create visual distraction, making the image appear cramped or uneven.
When in doubt about your card’s realistic shot at a PSA 10, check the exact tolerances at PSA 10 centering requirements.
Common Challenges for Beginners
- Eyeballing without References
Novices often trust their unaided vision. Without a template or slab for comparison, you may grossly underestimate misalignment. - Ignoring One Direction
Many beginners check only left-to-right centering and forget top-to-bottom alignment. The worst-direction rule will catch you off guard. - Borderless or “Busy” Designs
Cards without clear frames (e.g., full-bleed images) require using logos, text boxes, or stat bars as grid markers. - Overlooking Back Centering
A badly aligned back can still subtract 0.5 grade points. Dual-sided cards often slip through unmeasured. - Unfamiliar Grading Standards
“Looks centered” doesn’t guarantee a 55/45 or 60/40 ratio. Learn each company's centering thresholds before submission. - Bad Lighting or Clutter
Shadows, glare, and busy backgrounds distort border edges and make lines appear straighter than they are.
Essential Beginner Card Centering Tips
Tip 1: Work in a Dedicated Clean Workspace
- Flat, clear surface: Use a sturdy table with a non-reflective mat.
- Remove dust, sleeves, and clutter: Prevent shadows and unwanted lines.
- Follow PSA Workspace Recommendations for a neutral background.
Tip 2: Use Proper Lighting & Magnification Tools
- Even, diffused LED lamp: Avoid spotlights that cast shadows on one edge.
- Rotate the card: Check from multiple angles for consistent light.
- Loupe or magnifying lamp: See fine printed lines on intricate designs.
- See the Beckett Lighting Guide for practical setups.
Tip 3: Align Cards Against Graded Reference Standards
- Side-by-side with PSA 10, BGS 9.5+, or CGC 9.5+ slabs.
- Check border thickness: Note thicker or thinner sides.
- Review the CGC Comparison Tutorial.
Tip 4: Practice with Different Cards
- Sample 10–15 cards: Mix modern, vintage, on-bordered, and borderless.
- Rank by perceived centering; verify with a ruler or calipers.
- Rotate through your collection weekly to sharpen judgment.
Tip 5: Use Reference Points on Borderless Designs
- Identify logos, text boxes, or stat bars as “border” markers.
- Visualize gridlines between these elements and card edges.
- Explore Online Centering Hacks for full-bleed cards.
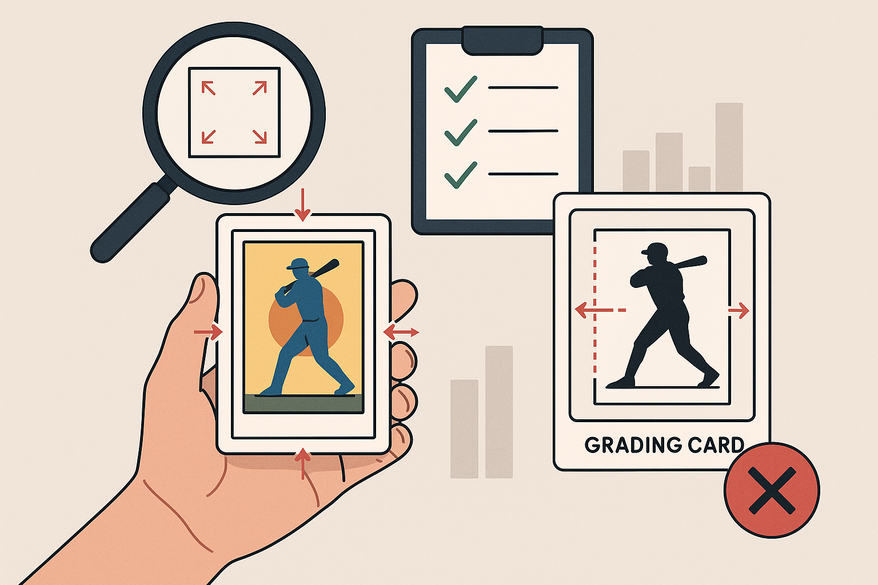
Visual Aids & Diagrams
Below are three conceptual diagrams with ratio calls for self-study. Create your own overlays when practicing to match these examples:
Diagram 1: Perfect Centering (50/50)
Alt-text: A card with equal left/right and top/bottom borders overlaid by a grid with “50/50” labels.
Diagram 2: Slightly Off-Center (60/40)
Alt-text: A card shifted slightly left, showing thicker left border; grid labels “40/60” L–R and “50/50” T–B.
Diagram 3: Heavily Off-Center (75/25)
Alt-text: A card pushed toward the bottom with grid labels “75/25” T–B and “50/50” L–R.
Tools & Resources
- PSA-aligned centering overlay: Legends Card Center Grading Tool with incremental border lines.
- Precision ruler or calipers: Mitutoyo vernier calipers for millimeter accuracy (Mitutoyo).
- Soft microfiber cloth: Remove dust before overlay use.
- Penny sleeves & semi-rigid holders: Protect cards once evaluated.
Online resources & further reading:
Practical Step-by-Step Guide
- Set Up Workspace: Flat mat, solid background, even lighting, tool ready.
- Visual Inspection: Note obvious tilts; identify the worst direction.
- Measure with Tool: Align edges or logos with overlay; read differences.
- Measure Both Directions: Record left-to-right and top-to-bottom ratios.
- Compare to Target Grade: PSA 10 (~55/45 or better); BGS 9.5+ (~60/40 or better).
- Record Observations: Log front and back centering ratios.
- Protect & Store: Wipe dust; place into a penny sleeve and semi-rigid holder.
Final Thoughts & Encouragement
Card centering is a vital subgrade that influences both grade and market value. By mastering these tips you can:
- Recognize and avoid common pitfalls
- Use simple tools and reference standards for accurate ratios
- Develop a trained eye through regular practice
Your confidence and grading accuracy will grow each time you set up a clean workspace, use proper lighting, align with known slabs, and measure carefully. Share your insights or questions in the comments to help fellow collectors.
Call-to-Action
Ready to elevate your grading game?
- Sign up for our newsletter on card grading fundamentals [link placeholder]
- Explore related posts:
- How to Inspect Card Surfaces & Edges [URL placeholder]
- Packaging & Shipping Cards for Grading [URL placeholder]
- Building a Pre-Grading Checklist [URL placeholder]
Implement these beginner card centering tips today and watch your collection’s quality—and value—improve.
FAQ
- What is perfect centering?
- Perfect centering means the printed image sits exactly in the middle of the card, with equal borders on all four sides (a true 50/50 balance).
- How can I measure centering without expensive tools?
- You can use a ruler or offset grid overlay downloaded from PSA’s website. Align edges or reference points and compare distances side-to-side and top-to-bottom.
- What centering ratio qualifies for a PSA 10?
- A PSA 10 generally requires about a 55/45 ratio or better in both directions. Always check current PSA tolerances before submitting.
- Does back centering affect the final grade?
- Yes—though it carries less weight than front centering, a poorly centered back can still subtract up to 0.5 grade points.


