DIY Card Centering Jig: Build a Perfect Alignment Tool for Card Making
Create a DIY card centering jig for precise card alignment, ensuring faster workflow, consistent quality, and professional-looking card designs.
Estimated reading time: 6 minutes
Key Takeaways
- Precision – Achieve professional, symmetrical card layouts every time.
- Efficiency – Streamline your workflow by reducing repeated measurements.
- Customization – Build and adapt the jig for any card size and style.
- Cost-saving – Use simple materials to create a durable, reusable tool.
- Versatility – Modify rails, stops, and guides for advanced or beginner designs.
Table of Contents
- Introduction
- Purpose and Benefits of a DIY Card Centering Jig
- Materials and Tools Required
- Step-by-Step Building Guide
- Customization & Alternative Designs
- Troubleshooting & Tips for Success
- Safety Considerations
- Conclusion
A DIY card centering jig is a simple homemade tool that helps place panels, toppers, sentiments, and layers perfectly in the center of cards. By using fixed right-angle fences and center crosshairs, it delivers clean, professional-looking results every time.
Precision alignment matters in card making because it:
- Reduces guesswork and eliminates repeated measuring
- Speeds up workflow by turning alignment into a single step
- Improves consistency across multiple cards or layers
Building your own jig also saves money and lets you tailor the tool to your favorite card sizes and layouts. For a comparison of homemade vs professional centering methods, check out the DIY card centering techniques guide.
Purpose and Benefits of a DIY Card Centering Jig
A DIY card centering jig offers clear advantages for hobbyists and professional card makers alike.
Improved accuracy
- Fixed 90° fences and marked crosshairs ensure every panel lands in the same spot.
- Eliminates the need for rulers or repeated measurements when aligning mats or sentiments.
Professional finish
- Even borders and balanced layouts enhance card aesthetics and elevate perceived quality.
- Clean symmetry is vital for minimalistic or layered designs.
Faster workflow
- Positioning a card base into the jig corner and dropping in elements takes seconds.
- Reduces frustration from lifting and resticking misaligned pieces.
Waste reduction
- Consistent placement minimizes misaligned layers and torn cardstock from repositioning.
Creative satisfaction
- Crafting your own tool adds a sense of ownership.
- Fine-tuning the jig becomes part of the creative process.
Materials and Tools Required
Gather these basic materials and tools to build a durable alignment jig tailored to card making.
Materials
- Base
- ¼″ or ½″ plywood, MDF, or flat hardwood board
- Acrylic sheet as alternative for transparency
- Sturdy chipboard or foam board for a lightweight version
- Side rails / fences
- ¼″×¾″ wood strips
- L-shaped metal brackets
- Acrylic strips for a sleek look
- Fasteners & adhesives
- Wood glue or strong craft adhesive
- Small screws (if wood or metal brackets)
- Double-sided tape for non-permanent fixtures
- Measurement elements
- Ruler or measuring tape
- Fine-tip permanent marker
- Optional: self-adhesive measuring strip or printed grid acetate
- Optional features
- Metal brackets for adjustable stops
- Binder clips or magnets for holding panels
- Rubber feet or cork pads to prevent slipping
Tools
- Saw (hand saw, miter saw, or hobby saw)
- Drill with bits (for screws or adjustable features)
- Screwdriver (manual or electric)
- Measuring tape or ruler
- Pencil and square for marking right angles
- Sandpaper for smoothing edges
- Craft knife for chipboard or foam board cuts
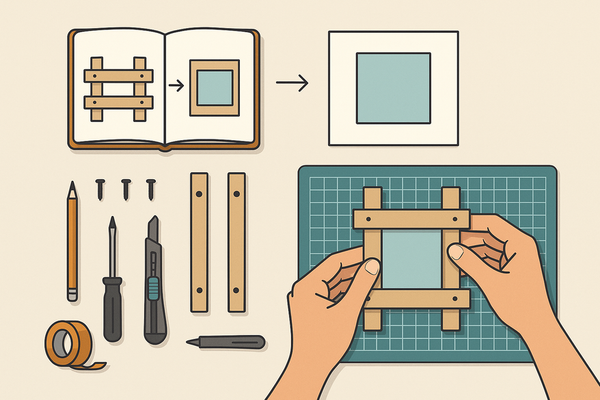
Step-by-Step Building Guide
Follow these detailed steps to construct a jig for standard A2 cards (4¼″×5½″). Adjust dimensions for other card sizes as needed.
- Plan & Sketch Design
- Select target card sizes (A2, A7, square).
- Sketch a top-down view:
- Base dimensions (e.g., 9″×7″ for A2)
- Two right-angle fences (bottom and left)
- Center crosshair and optional grid or stops
- Cut Base & Rails
- Measure and mark base on chosen material.
- Cut base to size using a saw.
- Cut two rail strips: one matching base width, one matching base height.
- Sand edges smoothly.
- Mark Center & Layout Lines
- Outline the card “box” area on the base.
- Find midpoints: measure half the width and half the height.
- Draw vertical and horizontal center lines (crosshair).
- Attach Rails
- Position bottom rail along the lower edge of the card box.
- Position left rail to form a 90° angle with bottom rail.
- Verify squareness with a square.
- Glue rails, clamp, then reinforce with screws or tape.
- Wipe away excess glue before it dries.
- Add Measurement Guides
- Mark rail midpoints with notches or pen marks.
- Indicate common panel sizes (e.g., 3¾″×5″ for A2).
- Optionally overlay printed grid acetate aligned to crosshair.
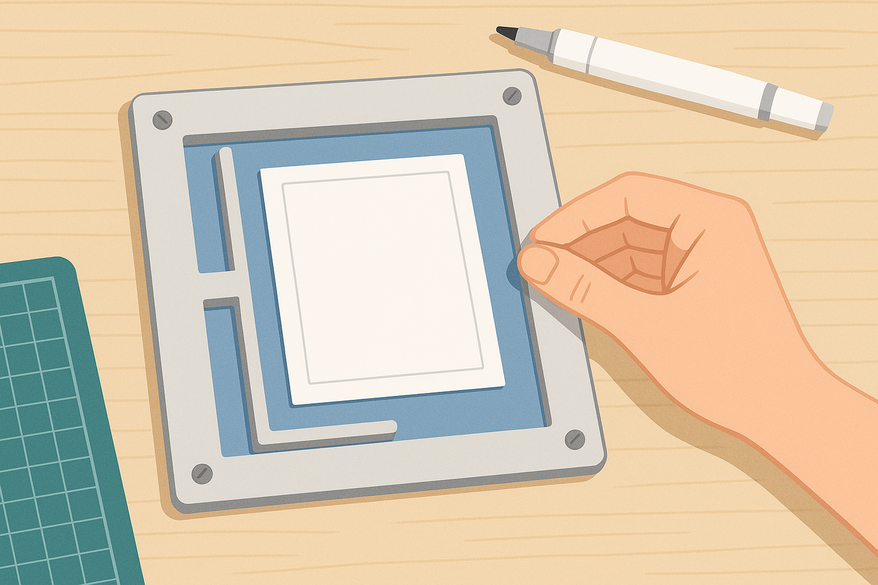
- Test & Fine-Tune
- Insert an A2 card base into the corner.
- Place a panel and check alignment against crosshair and grid.
- If off, re-measure, sand rails, or adjust marks.
- Repeat tests for additional card sizes if multi-purpose.
Customization & Alternative Designs
- Adjustable rails/stops – Slide fences in slots tightened with screws or wing nuts for multiple card sizes.
- Sentiment strip guides – Engrave or draw horizontal lines at common banner distances.
- Die-cut templates – Use negative die shapes as center guides for consistent die-cut positioning.
- Magnetic surface – Attach a thin metal sheet under the base to hold panels or dies with magnets.
- Transparent acrylic jig – Etch or print a grid on clear acrylic for direct view of card patterns.
- Beginner version – Chipboard base + glued strips + drawn guides—no power tools needed.
- Intermediate wooden jig – Fixed rails + self-adhesive ruler tape for quick reference.
- Advanced adjustable jig – Laser-cut sliding rails, interchangeable inserts for multiple formats.
For precise, automated centering measurements of trading cards before grading, consider the Card Centering Tool web app.
Troubleshooting & Tips for Success
- Misaligned rails – Re-glue rails using a right-angle tool; clamp until dry.
- Incorrect center lines – Re-measure card area, redraw midlines, cover old marks with tape.
- Slipping base – Add rubber feet, cork pads, or a non-slip mat underneath.
- Panels off-center – Verify panel dimensions; use jig centering based on exact sizes.
- Use sharp pencils or fine-tip markers for precise lines.
- Test with plain white panels to evaluate true border equality.
Safety Considerations
- Wear safety glasses during cutting or drilling.
- Keep fingers clear of blades; secure material before cutting.
- Work in a well-ventilated area when using glues and sprays.
- Maintain a stable, uncluttered work surface with good lighting.
- Keep children and pets away from active tools and adhesives.
Conclusion
A DIY card centering jig delivers precision, speed, consistency, and a professional finish while saving costs. Start with a basic version using simple materials, then customize and upgrade as your crafting evolves. Share your creations—post photos, measurements, or grid layouts to inspire the crafting community and help others build their perfect alignment tool.
FAQ
How accurate is a DIY card centering jig?
With properly squared fences and well-marked crosshairs, you can achieve nearly perfect alignment—often within fractions of a millimeter.
Can I adjust the jig for different card sizes?
Yes. Using adjustable rails or sliding stops allows quick changes for formats like A2, A7, or square cards without rebuilding the entire jig.
What materials are best for a durable jig?
Medium-density fiberboard (MDF) or hardwood plywood provide a sturdy base. Acrylic versions offer transparency but may require careful handling to avoid cracks.
Do I need special tools to build this jig?
No. Basic tools like a hand saw, drill, ruler, and clamp are sufficient. Advanced versions may use laser cutters or metal fabricating tools.
How can I troubleshoot misalignment issues?
Check rail squareness with a carpenter’s square, confirm centerline accuracy, and ensure the base sits flat. Fine-sanding or re-gluing ribs often resolves persistent errors.