Lighting Tips for Trading Card Photography: Achieving Perfect Alignment
Discover essential lighting tips for trading card photography to enhance card alignment, avoid glare, and improve color accuracy.
Estimated reading time: 12 minutes
Key Takeaways
- Proper lighting is crucial to avoid glare, improve color accuracy, and ensure precise card center alignment.
- Diffusers and modifiers, like softboxes or DIY cloth diffusers, soften harsh light and reduce hotspots on glossy surfaces.
- A symmetrical two-light setup at 45° angles, combined with reflectors, delivers even illumination and reveals fine details.
- Use grid overlays, a tripod or overhead mount, and alignment aids to maintain consistent framing and parallel edges.
- Experiment with natural overcast light versus neutral white LED panels to find the best color rendition for your environment.
Table of Contents
- Importance of Lighting in Trading Card Photography
- Understanding Card Center Alignment
- Essential Lighting Tips for Trading Card Photography
- Natural vs. Artificial Lighting
- The Role of Diffusers and Modifiers
- Lighting Angles and Placement
- Tips on Using Reflectors
- Equipment and Setup Recommendations
- Practical Step-by-Step Guide
- Real-World Examples and Case Studies
- Conclusion and Call to Action
Trading card photography is the practice of capturing high-quality images of cards for marketplaces, social media, and grading submissions. For a comprehensive overview of shooting cards for grading accuracy, see trading card photography guide. Proper lighting is the single most important factor in trading card photography. Good lighting helps avoid glare, improve color accuracy, and ensure accurate card center alignment. For an in-depth look at optimal lighting specifically for centering, check optimal lighting for card centering.
We’ll start by explaining why lighting matters, then define card center alignment. Next, we’ll dive into essential tips on natural versus artificial light, diffusers, lighting angles, and reflectors. We’ll recommend equipment and setup, outline a step-by-step workflow, and share real-world examples and case studies. By the end, you’ll know how to light your cards like a pro and present them perfectly centered every time.
Importance of Lighting in Trading Card Photography
Lighting controls three critical aspects of your shot:
- Shadow control
Harsh shadows can hide card edges and corners, making assessment of wear or centering impossible. Soft lighting exposes all edges evenly. - Color accuracy
Color temperature—bulbs versus daylight—impacts how true the card’s colors appear. Warm or cool bulbs distort reds, blues, and foil hues. - Clarity and detail
Holo and foil patterns need crisp, bright light to reveal sparkle without whiteout glare. Proper illumination boosts fine-print legibility.
Challenges unique to trading cards:
- Glare from glossy or foil surfaces
- Reflections off protective sleeves, top-loaders, and slabs
- Uneven illumination causing one side to look darker or closer than the other
Good lighting helps avoid glare and is essential for accurate card center alignment.
Understanding Card Center Alignment
Card center alignment means:
- Edges parallel to the photo frame
- Equal spacing on all four sides
- Uniform visibility of corners without shadow or glare
Why it matters:
- Professional presentation
Centered cards look polished on eBay, Etsy, and Instagram. - Grading accuracy
Graders need straight-on, evenly lit shots to judge centering and edge wear. - Consistent thumbnails
Content creators rely on uniform card placement for branded feeds and catalogs.
Accurate centering evaluation requires evenly lit, straight-on photos.
Essential Lighting Tips for Trading Card Photography
Natural vs. Artificial Lighting
Natural lighting
Benefits:
– Soft, neutral color from indirect window or overcast outdoor light.
– Minimal equipment needed.
Drawbacks:
– Inconsistent as weather and time change.
– Midday sun causes harsh glare.
Recommendation: Shoot outside on overcast days or next to large windows to get even, neutral light without hotspots.
Artificial lighting
Benefits:
– Control over intensity and color temperature with LED panels, desk lamps, or ring lights.
– Consistent results any time of day.
Drawbacks:
– Risk of color casts if mixing bulb types.
– Hotspots without diffusion.
Tip: Use neutral white LED bulbs and avoid mixed color-temperature sources for true-to-life color.
The Role of Diffusers and Modifiers
Diffusers and modifiers turn harsh point light into broad, even illumination. Examples include softboxes, umbrella modifiers, parchment paper, or translucent plastic. Benefits for card photography:
- Reduces glare on glossy surfaces
- Softens shadows around edges
- Reveals consistent detail for precise alignment
Even DIY diffusers (white cloth or frosted plastic) can dramatically reduce hotspots and reflections.
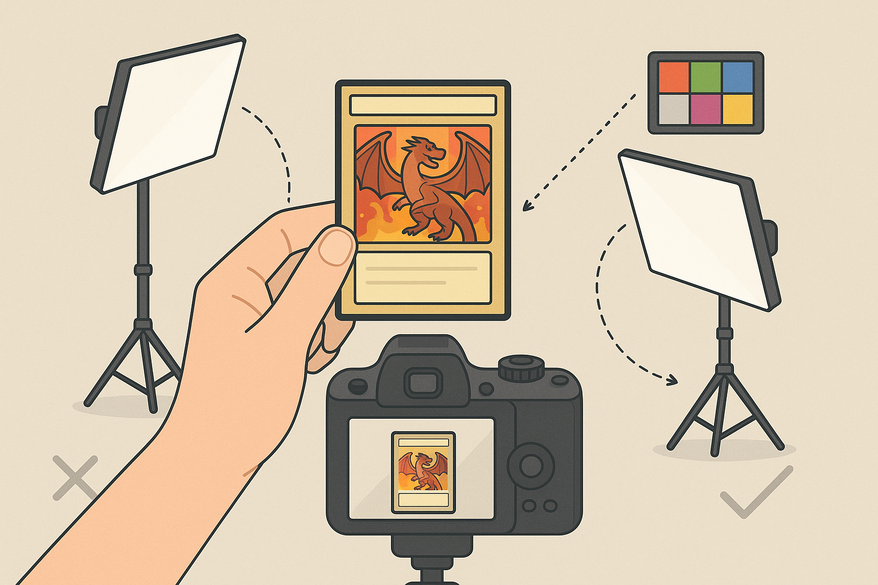
Lighting Angles and Placement
Key setup for glare reduction and balance:
- Two 45° side lights
Place primary lights at 45° angles from left and right, slightly above the card plane. This wrap-around lighting minimizes reflections on foil and holo surfaces. - Avoid direct overhead light
Overhead fixtures produce strong center hotspots and dim edges. - Symmetrical two-light setup
Match each light’s intensity and color temperature. Unequal side lighting can make edges look misaligned. - Distance and height
Position lights 2–3 feet from the card, 6–12 inches above its surface. This range balances brightness with soft shadows.
Tips on Using Reflectors
Reflectors bounce light onto darker sides, acting as a fill light without extra fixtures. Common tools: white foam board, collapsible silver/white reflectors, or card stock. Positioning:
- Opposite the main light to even out shadows
- Under the front edge of the card to lift edge shadows and highlight corner detail
Simple white reflectors can mimic a second light source and help maintain accurate card center alignment. For a detailed lighting setup reference, see detailed lighting setup reference.
Equipment and Setup Recommendations
Essential gear:
- Camera or smartphone with grid overlay—use grid lines to align edges
- Tripod or overhead mount—ensures consistent framing and prevents tilt
- Neutral white LED light sources—ring lights or LED panels for control
- Diffusers/modifiers—softboxes or translucent panels
- Reflectors—white foam board or collapsible silver/white discs
- Solid background—white or black foam board, mouse pad for uniform surface
- Alignment aids—grid-lined mat or card stand for precision placement
Station layout:
- Card centered on a flat background
- Camera mounted directly above, lens aligned to card center
- Two diffused lights at 45° left and right, slightly elevated
- Reflector opposite the brighter light to fill shadows
- Grid lines visible in the frame to confirm parallel edges
Practical Step-by-Step Guide
Step 1: Prepare card
Remove dusty sleeves and clean surfaces. If photographing in top loaders or slabs, wipe down the plastic to remove fingerprints.
Step 2: Position background and camera
Lay a solid white or black background near your mounting point. Set camera height so the lens is centered over the card. Turn on grid lines to align edges perfectly.
Step 3: Arrange lights
Place two primary lights at 45° angles on either side of the card, slightly above it. Attach diffusers to soften light and minimize glare.
Step 4: Add reflectors
Position a white reflector opposite your main light to bounce fill light onto shadows. Experiment with reflector size and angle to equalize brightness on all sides.
Step 5: Frame and align
Use grid lines to ensure parallel top/bottom and left/right edges. Confirm equal spacing around the card.
Step 6: Test and troubleshoot common issues
• Glare—adjust light angle, increase diffusion, or tilt card slightly.
• Uneven lighting—increase reflector size, balance intensities, or reposition lights.
• Color cast—switch to neutral white bulbs, eliminate mixed sources.
Real-World Examples and Case Studies
Case Study A: Overhead Lamp vs. Diffused 45° Side Lights
Before: Single overhead lamp created a hotspot in the center, dark corners, and a tilted appearance.
After: Two side lights at 45° with softboxes and a reflector delivered even illumination, visible holo sparkle, and a perfectly centered look.
Case Study B: Direct Sun Outdoors vs. Overcast Window Light
Before: Midday sun outdoors produced strong glare and washed-out colors. Edges lost definition.
After: Card shot next to a window on an overcast day showed accurate colors, balanced exposure, and clear edges for a professional presentation.
Expert Insights:
- “Overcast natural light near a window often outperforms studio lights for color accuracy.”
- “Avoid zero direct overhead light; side angles make centering easier and reduce hotspots.”
Conclusion and Call to Action
Optimizing lighting tips for trading card photography is key to achieving clear, glare-free images and maintaining accurate card center alignment. By experimenting with natural versus artificial light, using diffusers and reflectors, and positioning your lights at 45° angles, you can produce clean, professional-looking images every time. Try these techniques, compare before-and-after shots, and share your results or questions in the comments below. For more on camera settings and post-processing workflows, check out our related posts and keep elevating your card photography game.
Before you submit your perfectly lit and centered cards for grading, make sure they’ll meet centering standards by using the Card Centering Tool. It automatically measures your card’s front and back centering ratios with sub-millimeter precision and flags PSA, BGS, and CGC pass/fail thresholds—saving you submission fees on cards that won’t reach Gem Mint.
FAQ
How can I avoid glare when photographing trading cards?
Use diffusers, position lights at 45° angles, and consider reflectors to soften harsh reflections on glossy or foiled surfaces.
Should I use natural or artificial light for card photography?
Natural light on overcast days provides soft, neutral color, while artificial LED panels offer consistent control; choose based on your shooting environment.
What’s the best way to ensure precise card alignment?
Enable grid overlay on your camera or smartphone, use a tripod or overhead mount, and align edges with the grid lines for perfect centering.
Can I use DIY diffusers and reflectors?
Absolutely. White cloth, parchment paper, foam boards, or card stock can serve as effective diffusers and reflectors when positioned correctly.


