How to Navigate Centering Analyzer Interface: A Step-by-Step User Guide
Learn how to navigate the centering analyzer interface to improve your card grading process with our step-by-step guide. Avoid mistakes and enhance accuracy.
Estimated reading time: 2 min read
Key Takeaways
- Automated Precision: The centering analyzer interface measures left-to-right and top-to-bottom ratios instantly.
- Intuitive Controls: Upload or capture card images, place reference markers, and adjust alignment with ease.
- Quality Setup Matters: High-resolution, well-lit images and consistent camera positioning ensure accurate results.
- Advanced Workflow: Utilize batch processing, API integrations, and standardized documentation for efficiency.
- Troubleshooting Tips: Learn how to resolve common issues like undetected cards and slow performance.
Table of Contents
- Overview of the Centering Analyzer Interface
- Preparing to Use the Interface
- Step-by-Step Navigation Guide
- Troubleshooting Common Navigation Issues
- Advanced Tips & Best Practices
- Conclusion
- Call to Action
Understanding how to navigate the centering analyzer interface is key to ensuring your trading cards meet strict border alignment standards before you submit them for professional grading. This tool measures left-to-right and top-to-bottom ratios automatically, helping collectors and sellers catch off-center cards early and avoid wasted grading fees. For a deeper dive into manual and automated centering assessment, check out our comprehensive guide.
For an all-in-one, web-based solution that flags PSA, BGS, and CGC tolerances instantly, consider using Card Centering Tool. It helps you measure centering with millimeter precision on both front and back so you can submit only your best candidates.
1. Overview of the Centering Analyzer Interface
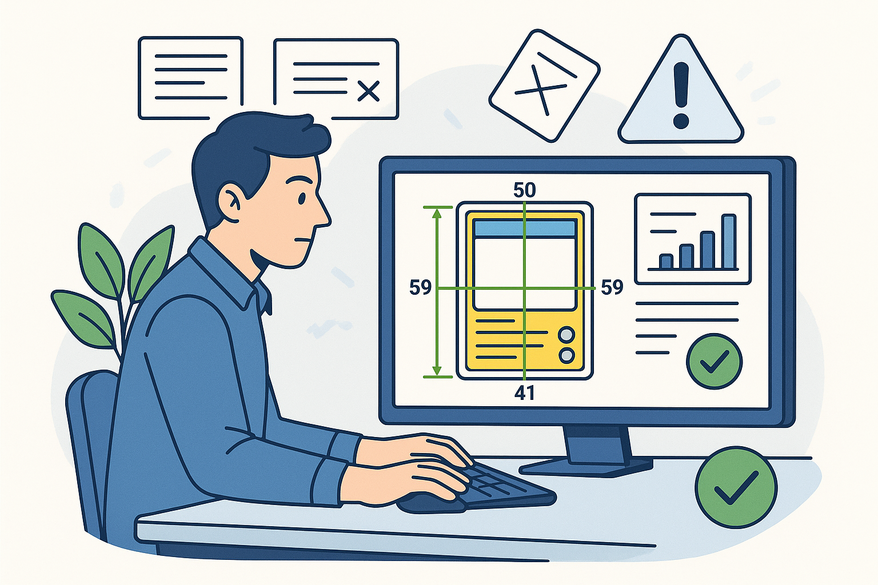
The centering analyzer interface is your command center for border alignment checks. Here you can upload or capture an image of your card, place reference markers on all four edges, and immediately see the centering percentages. Key components include:
- Image input area: Upload a photo or launch live capture.
- Alignment controls: Drag edge markers, adjust crop, and rotate.
- Measurement display: View left-to-right and top-to-bottom ratios.
- Analysis/export controls: Save reports or revisit past analyses.
Efficient navigation here prevents false measurements that could skew your grading decisions.
2. Preparing to Use the Interface
Before you begin, make sure you have:
- A high-resolution, glare-free image of your card.
- A stable internet connection and a modern browser.
- Proper card orientation—flat, square, and well-lit.
Then simply sign in or create an account, upload your image, and preview it in the workspace to confirm there’s no tilt or cutoff.
3. Step-by-Step Navigation Guide
Follow these steps for seamless interface navigation:
- Log in and access the main dashboard.
- Upload your card photo or switch to live capture.
- Familiarize yourself with the menu bar, toolbar, main canvas, results panel, and action buttons.
- Place edge markers on all four borders.
- Adjust the crop box so no border is clipped.
- Click “Analyze” to generate centering ratios.
- Review the percentage results and any misalignment notes.
- If needed, tweak the markers or re-capture and re-run the analysis.
- Save or export your report for submission records.
For a visual walkthrough of these steps, see our detailed tutorial.
4. Troubleshooting Common Navigation Issues
Even seasoned users run into hiccups. Here are quick fixes:
- Card not detected: Upload a sharper, more evenly lit image.
- Inconsistent results: Keep your camera distance and angle uniform.
- Hidden controls: Resize or refresh your browser window.
- Slow interface: Clear cache or try a different browser.
Consistent setup is the secret to repeatable results.
5. Advanced Tips & Best Practices
Once you’ve mastered the basics, optimize your workflow:
- Standardize camera distance, background, and lighting.
- Capture high-resolution images for better edge detection.
- Explore batch processing or API integrations for large collections.
- Document your setup—camera model, lighting, browser version—for consistency.
For more essential tips on accurate centering checks, see our guide on accurate centering checks.
Conclusion
Mastering the centering analyzer interface will streamline your pre-grading workflow and minimize costly submission mistakes. By following a clear, repeatable process—image capture, marker alignment, analysis, and review—you’ll achieve faster, more accurate centering measurements and make smarter grading decisions.
Call to Action
Have questions or workflow hacks of your own? Leave a comment below and share your tips. Don’t forget to subscribe for more how-to guides and tool tutorials to enhance your card grading toolkit!
FAQ
- Q: What image formats are supported?
A: The interface accepts JPEG, PNG, and high-quality scans up to 6000×4000 pixels. - Q: Can I analyze multiple cards at once?
A: Yes—use the batch processing feature or integrate via our API for large collections. - Q: How do I fix misalignment errors?
A: Re-capture the image with even lighting, ensure the card is flat, and adjust markers manually before re-running the analysis.


