Pokemon Card Centering Tips: The Ultimate Guide to Perfectly Centered Pokémon Cards
Discover essential pokemon card centering tips to enhance your collection's grading value and aesthetic. Learn how to spot and correct common centering issues.
Estimated reading time: 8 minutes
Key Takeaways
- Centering determines how evenly art sits within a card’s borders, influencing both eye appeal and grading value.
- Border splits such as 50/50 or 55/45 affect whether a card earns a top subgrade from PSA, BGS, or CGC.
- Simple tools like rulers or jigs can reveal off-centering, while AI-driven calculators deliver sub-millimeter precision.
- Proper handling and storage—penny sleeves, toploaders, archival boxes—preserve centering and protect against edge wear.
Table of Contents
- Section 1: Understanding Card Centering in Pokémon
- Section 2: Common Centering Issues in Pokémon Cards
- Section 3: Step-by-Step Practical Pokémon Card Centering Tips
- Section 4: Tools & Techniques for Accurate Assessment
- Section 5: Best Practices for Maintaining Pokémon Card Quality
- Conclusion & Call to Action
Section 1: Understanding Card Centering in Pokémon
Keyword: pokemon card centering tips
What Is Centering?
- Centering measures the space from the outer edge of a card to its inner colored border (not the art box).
- It ensures even border thickness on left vs. right and top vs. bottom.
Perfect 50/50 vs. Grading Tolerances
- A perfectly centered card has 50/50 margins on all sides.
- PSA allows roughly 55/45 to 60/40 splits on the front for top grades (learn more: PSA 10 centering requirements).
- Back centering tolerances can be as loose as 75/25 for premium grades.
Why Centering Affects Eye Appeal and Grading Value
- Our eyes detect asymmetry quickly; a 60/40 border feels unbalanced.
- Grading companies assign a centering subgrade that can make or break a Gem Mint 10.
- Even flawless surfaces or sharp corners won’t save a card with poor centering.
Real-World Example
At a local card show, two identical Charizards looked worlds apart: one had perfect margins, the other had a noticeably thin left border. Collectors paid 50% more for the well-centered card simply because it looked sharper. Explore a centering calculator, a visual guide to centering, and an article on how to check card centering to see similar comparisons.
Section 2: Common Centering Issues in Pokémon Cards
Keyword: misaligned cards
Typical Centering Problems
- Left–right off-centering: A vertical border is noticeably thicker—look for a shift of 1 mm or more.
- Top–bottom off-centering: One horizontal border at the top or bottom is wider; rotate the card to spot it.
- Diagonal shift: The image drifts toward one corner, making two adjacent borders thin.
- Miscut/misaligned cards: Factories sometimes cut cards so far off-center that part of another card or art shows.
- Inner line distractions: Black inner lines (Sun & Moon era) can trick your eye. Focus on the main colored or silver frame.
How to Spot Issues
- Place the card on a dark, neutral background to highlight uneven margins.
- Rotate the card 90° or 180° to break visual bias.
- Compare front and back separately; back centering matters less but still influences grading.
Collector Tip: Print a simple border template and lay the card over it. This low-tech trick often reveals small shifts you’d otherwise miss. See a video tutorial for a quick demo.
Section 3: Step-by-Step Practical Pokémon Card Centering Tips
Keyword: visual check
- Use a Neutral, Well-Lit Background: Place cards on matte black or white paper to make thin borders pop. Avoid glare by using indirect, diffused light.
- Perform a Quick Visual Check: Compare top-left vs. top-right, then bottom-left vs. bottom-right. If any border looks wider, you’re likely at or beyond a 60/40 split.
- Rotate the Card: Turn it 90° or 180° for a fresh perspective and reduced bias.
- Focus on the Main Border: Inner framing lines can distract. For Sun & Moon and later sets, use the colored frame for measurement.
- Decide on Acceptable Ranges: Casual players: up to 65/35 on the front is fine. Serious collectors: aim for 55/45 or better front and under 75/25 back. Gem Mint targets require near-perfect front centering for a 10.
Advice for Casual Players vs. Serious Collectors
Casual players: Don’t obsess over minor shifts; focus on playability and edge wear. Avoid cards with paper-thin borders—they distract.
Serious collectors: Use digital tools or AI to verify splits (see how to measure card centering: a step-by-step guide). Only submit cards consistently at 55/45 or better—remember, a 9 vs. a 10 can translate to hundreds of dollars.
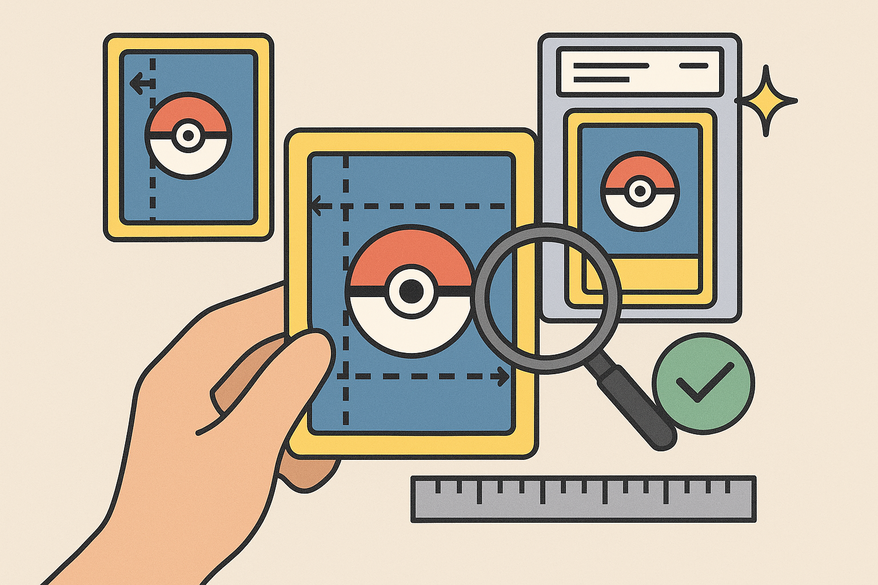
Section 4: Tools & Techniques for Accurate Assessment
Keyword: centering calculator
Low-Tech Methods
- Millimeter Ruler or Calipers: Measure each border precisely, then calculate percentages: left ÷ (left+right), top ÷ (top+bottom).
- Transparent Centering Jigs: Slide the card into a jig printed with scales (e.g., 50/50, 60/40) and read border ratios at a glance.
- Phone Grid Overlays: Use your camera’s grid or a printed overlay on your screen to align card edges with grid lines.
Digital & AI-Powered Tools
- Online Centering Calculators: Input border measurements to get instant percentages and grading advice (see how to measure card centering).
- AI Analysis Platforms: Upload a straight-on photo and receive exact splits for all four borders—perfect for cards near grading cutoffs.
- Grading Communities & Forums: View side-by-side examples of acceptable vs. failing centering and crowdsource opinions on borderline cards.
Make the Most of Card Centering Tool
For maximum precision, many collectors use Card Centering Tool, a web app that automatically measures front and back centering and flags whether your cards meet PSA, BGS, and CGC standards. Watch the quick preview below and avoid wasted grading fees:
Section 5: Best Practices for Maintaining Pokémon Card Quality
Keyword: penny sleeves
- Sleeve New Cards Immediately: Place fresh pulls in penny sleeves, then add toploaders or semi-rigid holders for extra protection.
- Use Deck Protectors in Play: Shield edges and corners during matches to prevent whitening that highlights centering flaws.
- Store in Optimal Conditions: Keep cards in a cool, dry, dark environment. Avoid direct sunlight and plastic bags.
- Handle by the Edges: Touch only borders to keep surfaces clean. Dust off with a microfiber cloth—no chemicals.
- Choose Acid-Free Binders and Boxes: Use side-loading archival pages and store boxes upright without overpacking to prevent bending.
Conclusion & Call to Action
Keyword: collectors community
Card centering defines how evenly artwork sits within borders, directly impacting both gameplay appeal and grading value. We’ve covered what centering is, typical alignment issues, practical checks, tools from rulers to AI, and best storage practices. Apply these pokemon card centering tips to assess your collection today: measure borders, use digital calculators, join grading communities, and protect precious cards in sleeves and toploaders. Share your findings with your collectors community—comparing real-world examples is the fastest way to sharpen your eye and secure top grades.
FAQ
Q: What front-centering ratio do I need for a Gem Mint 10?
A: Aim for a 50/50 split on all sides. PSA may accept up to 55/45 on the front, but true perfection seals the deal.
Q: Can a slightly off-center card still be valuable?
A: Yes—cards with minor off-centering can still fetch high prices, especially if artworks or populations are rare. However, perfect centering commands a premium.
Q: Which tools are best for beginners?
A: Start with a millimeter ruler or a transparent centering jig. These low-tech solutions reveal shifts quickly before you invest in digital options.
Q: How often should I re-check centering on stored cards?
A: Check before major grading submissions or if you notice edge wear. Otherwise, once every 6–12 months is sufficient to ensure protection hasn’t affected alignment.


